N.W. Egypt 1942
Fieldmarshal Rommel's legendary advance across the Western Desert was brought to a halt at the battle of Alam el Halfa. Forced onto the back foot, the Axis forces laid a series of complex defences and large minefields which they dubbed "Des Teufels Gärten" (The Devil's Gardens).
On the 23rd of October the quiet night was transformed into it's opposite as a thousand heavy guns discharged their cargo onto the German-Italian lines. Lt. Gen. Montgomery had initiated Operation Lightfoot, the aim of which was to rupture the enemy line and score a victory, and at this time of the war ... any victory would do!
Alas, the hope was too high as the attack became bogged down in the minefields.
On the 2nd of November a second offensive "Operation Supercharge" broke through, inflicted high casualties and drove all Axis forces out of Egypt.
When the dust of the operation was dampened down by rain some ten days later, a small insignificant railway station near the battlefield was to give it's name to military and world history.
As for my Dio, well I've never been a "What if" bloke but I must admit, that the thought pattern comes in very usefull when planning a project.
So, what if an Infantry unit found a way through the minefields but their way was barred by a small Wadi (a dryed-out river bed is a natural obsticle per-se so there would be no need for a minefield on either side) ?
What if they decided to fill it in with the help of some prisoners and wreckage ... plenty of both around at this time (using the Pz II as a tractor) ? It need not be too wide, just for boots and jeeps. What if a young R.H.A. officer was pushed for time and took a chance by ordering his myoptic driver over ... dislodging the Pz II's turret in the process ?
The Bedford QL and 6 pdr Gun Portee is a bit of an odd bird, but I think it's high center of gravity and it's skeleton-like appearance fit quite well into the story. It could also positiond to fire aft and was loaded on/off the truck by means of a winch and steel channels (belted here to the sides). The gun also could be fitted with additional shields (pinned to the upper sides here) when in normal ground use, but these were very rarely used in combat.
Notice that I've deliberately mis-spelt "Rheinbrücke" ... but on second thoughts ;o)
Weather or not, the 'Bad-ford' makes it or not I'll leave up to you. The main thing is though, that
three months to the day, on the 23rd of January 1943 British troops entered Tripoli ... 1400 miles to the East of that little Egyptian railway station.
Or as Winston Churchill put it: "Before El Alamein we never had a victory, after Alamein we never had a defeat".
Completed: 27.02.'17
Bedford QL & 6 PDR. Gun
Diorama 1:35 / Building Report:
Stage 1:
For the first Dio of '17 I've had to roll my sleeves up ... and in more ways than one!
To be honest, I didn't fancy building this model at all ... too fragile, ungainly and with an almost unbelievable high center of gravity. After a few 'thinks' I hit upon an idea that would underline these characteristics as opposed to disguise them, adding more 'weight' to the story ... so to say.
If you hang around for awhile you'll see what I mean.
I've bought a fair variety of figures allthough I only need seven for this job. I think I'll leave the retro Italeri signs unopend for the moment, you never know though, they might come in handy.
Last but by no means least, a few well read Osprey's kept within arms reach for instant reference.
The Bedford's wheels have to be milled out so that they fit together and then 'cooked' to give them a slight bulge where they meet the ground.
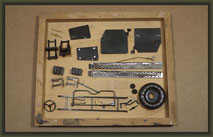
The Eduard PE set has added a lot of crisp detail to this 'old badger' of a kit. The only downside is that the model has become even more fragile than in it's OOB state.
If you screw your eyes up you might just see where I've thinned the gun shields down. The top of the main shield will be covered with scrim netting. Yes, I know it's a bluff but it's an acceptable one.
After a lot of kitting and cleaning I managed to make the 6 pounder look respectable.
Here's some additional vehicle parts (note sand shields) that have to be airbrushed and treated separately ... and to think that I've only just packed away one Chritmas tree !!
And now, as Tom Waits would say: "The lowside of the road".
I don't know if you remember, but awhile back I did mention a mate of mine who gave me a 'present' of some junk wrapped lovingly in a plastic bag. At first I wanted to bin it all but as it turnd out they do make good test pieces/dio fillers. This, plus other left over parts from the scrapbox were just the job for this rather unusual project.
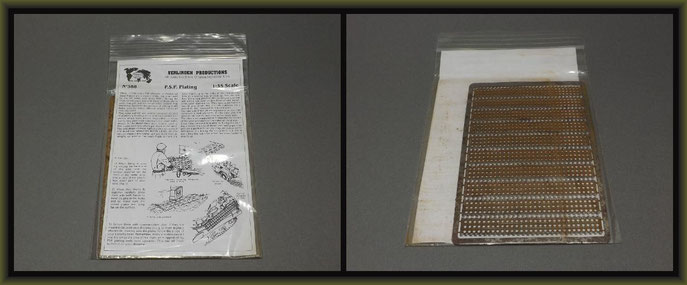
I would really like to fit this V.P. product: PSP Plating (aka Marston Mats) into my Dio. The thing is, that in spite of my research I can find no evidence of their use in the Western Desert in 1942. So if you do have or come across such a picture, I would be greatfull if you would mail it to me. Please remember the place and time and that I mean this type of plating and not the above mentiond sand shields.
A quick flash of the 'little fellas' and some of their gear.
The first stageing - an improvised (Jerry Built) bridge ... Wadi-ja-fink ;o)
10.01.'17
Stage 2:
I should have known ... Friday the 13th.
I've had my share of woe's with the figures. The plastic on the MiniArt and Bronco miniatures is a tic on the soft side, making kitting and cleaning all the more problematic. I find figure bashing to be the most time consuming of all Dio work, but there's no use forcing the issue. The 'little fella's' will tell YOU when their finished ;o)
So, just a Bucket-Flash tonight ... and if patience is my ally I'll have something for you in a few days.
13.01.'17
Stage 3:
The Bad-Ford & Co has been primed with Vallejo Black Primer and one of Rommels Pz 2's (or in this case one of his bridge supports) has copped for a base coat of light grey acylic. The same goes for the accessories. I once made a Dio and was 'caught-out' during the groundwork stage because I didn't have enough 'bits'. Since then I always make more than I need ... you can never get enough (eh?).
Another thing about making Dio-fillers is that it's a very good opportunity to practice chipping or new techniques.
After working my 'pinkies' to the bone, the 'little fellas' have decided they've had enough and have been sealed with Vallejo White Primer. On the 'tin' it advises a 12 hr drying time, I'll give them and the truck seven days. I'll move on to the base in the meantime ... better than watching it dry for a week ;o)
16.01.'17
Stage 4:
Time now for the dirty work ...
After smearing the base with a mixture of wood glue, clay and water, I've sculptured some texture into the walls. You can of course work with warm water which will cause cracking, but the downside with this is that you have no control of where these will occur ( you may make too many ). Squaring the sides ... thirsty work!
The base of the base.
As the wrecks are to be more suggested than presented, I've only done a rough job here ...
... and just when you think it can't get any worse.
Ah well, looks like I've hit 'rock bottom' on this one ... only one way to go now then.
22.01.'17
Stage 5:
The 'desert wanderers' have copped for a layer of acrylic before the oil paint.
The six-pounder, airbrushed with faded yellow (portland stone ??) and the camouflage pattern hand-painted with a very dark grey mix.
A fine 'dust' airbrushing tones down the cam and blends it in with the basic colour.
The same treatment for the truck and bits.
Notice that there is just as much detail on the underside of the model as on the top. On this pic you can just make out the faded cam. Right then, enough from me ... next stop completion.
27.01.'17
 The
Gun Bucket


